Using stencils to simplify the PCB assembly process
The process of creating a prototype circuit board involves a fairly large number of stages. This process begins with defining the characteristics of the circuit (development of technical conditions), then the stage of designing the circuitry of the board (often using a graphical representation of the circuit), then the stages of designing the board at the physical level (creating the topology of the board) and its production, and the whole process is completed with assembly. boards (see Fig. 1). Errors may appear at any of these stages.
 |
| Rice. 1. Stages of prototyping a circuit board |
With an increasing number of components available only in surface mount technology (SMT), manual assembly of boards by the development team - at least for prototype boards - is becoming less and less relevant. If you try to manually unsolder a 0804 size component, you will find that it is quite a difficult task, not to mention the smaller components. The problem is compounded by the fact that the weight of a component can be so light that even a slight breath of the operator can dislodge the component from its intended position on the board.
In addition, manual desoldering of BGA or similar packages is simply not possible. Engineers who deal with the problems of soldering leadless packages, in the vast majority of cases, can only advise how to install damaged leadless packages on the board in order to ensure component testing in a laboratory environment.
Therefore, more and more machine assembly is becoming a mandatory requirement for prototyping a board. The trouble is that the purchase of equipment for installation can be associated with exorbitant expenses. Even if you already have the hardware to mount the components, you will still need a stencil to apply the solder paste before starting to place the components on the board.
How to find the optimal solution when choosing between manual assembly of the board on your own and transferring the board assembly to another company? And when does purchasing a stencil become economically viable?Board assembly process
The board assembly process includes a number of steps, as shown in Fig. 2.
 |
| Rice. 2. Board assembly process |
Solder paste application
At the beginning of the assembly process, you need to apply solder paste to a new, component-free PCB. Solder paste is applied only to those areas of the board where you need to create a conductive contact between the component and the metallized mounting pad. Usually a soldering stencil is used for this. Moving along the solder mask placed directly on the board and fixed in the desired position, the slider squeezes a small amount of solder paste onto the board through the holes in the mask. Since the solder mask is generated from the data generated during the PCB design process, it has holes in the places where the pads should be located, and thus solder is applied only to the pads that are intended for soldering.
There are two basic types of solder stencils: frame stencils for use in soldering equipment and mock-up stencils for manually applying solder paste.
Component placement
The placement of components can be done either manually or using equipment. In manual placement, the technician uses tweezers to position each component on a specific area of the solder paste. In machine placement, a special mechanism with components loaded into it grabs the components and places them on the board. The pulling force of the solder paste is usually sufficient to hold the component in position. Component placement equipment uses component location and orientation data (which is usually stored in Centroid files) as reference information to correctly place components on the board. Centroid files are usually generated from data generated by the CAD system during board development.
Reflow heating and soldering
After the components are installed on the board, the next step in the assembly process is to run the board through the bulk solder. Reflow soldering is the most common method for soldering SMT components, especially for prototypes, although wave soldering equipment is sometimes used.
Testing
Functional testing of the board to verify that it is working properly
As you can see from this sequence of steps, the assembly process begins with the application of solder paste. The photo image of the board (see Fig. 3) shows that surface-mounted components, with insufficient soldering accuracy, can not only move closer to each other, but also their orientation or shortcuts can occur.
 |
| Rice. 3. Photo image of the board, on which a violation of the orientation of the components was allowed, as a result of which short circuits occurred |
To securely solder pinned components, the hole in the board must be filled with solder. Another prerequisite for reliable soldering is that there is no solder outside the mounting pads with the SMT component, otherwise short circuits may occur.Benefits of using solder paste
The process of first applying solder paste to the board and then placing the components in the solder paste areas has great advantages as the placement quality is improved as the solder paste is evenly distributed under the components before reflow.
The question, however, is how best to apply the solder paste. For this I use a stencil.What is a stencil?
The stencils are specially made in accordance with the requirements of the board on which the components are going to be mounted. Usually the stencil is made from a sheet of hard material (aluminum, copper, or mylar). In most cases, there are two ways to make a stencil: make it yourself or order it from a specialized company.
Self-production of a stencil
Limor Fried, founder of Adafruit Industries and a highly influential member of the do-it-yourself (DIY) community, posted online a description of how to make your own solder paste stencil.
I love how her instructions begin ... "You will need: 1. laser cutting machine."
Now some of us have the opportunity to purchase a laser cutting machine, but for many they are still not available. A search on the internet gives a price level for acceptable desktop laser cutters in the region of $ 5,000. I think if you had some mechanical design aptitude you might consider building a laser cutter yourself for a fraction of the cost. If you continue your search, you will find a set of instructions that you can use to create your own laser tool for about $ 50 from the included parts list. What do you think is the last item on this list? "A fair amount of patience."
Further research leads us to a free and open source kit for building your own laser cutting machine. Below is a quote from the developers of this free laser cutting machine.
“Laser cutting machines are usually quite expensive (you can spend as much as $ 30,000 on them), and many developers could do great things with them — if they owned one, or at least had regular access to it. Unfortunately, turnkey systems are quite expensive and there is no easy way to build them. We can fix that: In about 6 months, we can develop a laser cutting device that anyone can make, use and maintain. Most importantly, the device will be generally available, which means that anyone can improve and modify its design. ”
Faced with such recipes for creating your own equipment, in particular a stencil, on your own, and thinking about the choice between making it on your own and buying it, the thought involuntarily arises: whether to use the services of specialists to provide a stencil as part of the production process.
Buying a custom stencil
In the process of buying any fairly serious production equipment for the production of stencils within the company, it often comes to the decision that it is best to use the services of a specialized company to create the stencil that you need. The advantages of a custom-made stencil from a specialized manufacturer are:
- quality;
- speed of manufacture;
- the possibility of repeated orders.
In addition to the use of various materials, stencils are produced in two basic classes: frame and mock-up. Frame stencils are built on the basis of a special type of mounting fixture (frame) for attaching the stencil to the equipment for applying solder paste.
The dummy stencils are not mounted on the frame. Instead, the three edges of the stencil are usually bent at right angles, creating a notch for the solder paste, stiffening the stencil and allowing the operator to work with it. The dummy stencils are optimized for working with board prototypes. Model stencils have the following properties:
- availability;
- in fact have the same quality as production stencils;
- they can be made quickly;
- compactness;
- ease of use;
- are used once and are recyclable.When is a stencil economically viable?
It is possible that the company that assembles the boards is the best fit for you. Or maybe your project is so simple (for example, all the components with pins are used) that it is best to take a soldering iron and manually unsolder a huge number of components.
How do you find the optimal solution? The easiest way to use layout stencils is in the following situations.
- A significant number of surface mount components are available.
- Multiple changes are expected, but at this stage the final arrangement of the components has been accepted.
- It is necessary to simplify the soldering process (with high quality).
Let's consider how you can improve the technological route using a stencil. Estimating the time it takes to assemble the board by hand soldering, we get a pick / place / solder time of 2 minutes 20 seconds per component.
This is on average. It takes less time for passive components, and much longer for large discrete components or connectors. But if you consider the stage of filling the pads with solder, placing the component with tweezers and soldering the pins, then 2:20 per component looks quite real. Since the technician prepares and solders each component individually, the preparation and reflow time is included in the average estimated time for each component.
A different picture appears when using a soldering stencil for soldering. Unlike manual soldering, when using a stencil, the technician quickly applies a thin layer of solder paste to the entire board. The time required for the application of the paste becomes fixed, i.e. the application time for a large and complex board is the same for a more compact and simple board. Let's assume that it takes 2 minutes and 30 seconds to apply solder paste to the board using a stencil.
The time it takes to place components on a PCB using tweezers should be about the same as when manually soldering, except that when using a stencil, you will be placing the components all at once. This time decreases and increases depending on the number of components that need to be placed, and the amount of time required to grab, place and move a component to the desired pad can be estimated at approximately 20 seconds for each component. Recall that 20 s is included in the 2 min 20 s time interval required for manual soldering. Finally, using a stencil means you can use the oven reflow process to heat the solder paste and cure all components at the same time. Again, this stage requires a fixed time interval.
Finally, let's assume that labor costs for assembly in a laboratory are $ 25 per hour. And let's say you spent $ 120 to purchase a stencil.
The figures obtained are quite indicative, because only a small number of components are required for just one board for the stencil to start paying for itself - first, due to the time saved, and then, in terms of the overall quality of work and increased yield after assembly. The analysis of the time saved by using the stencil gave the following results:
- 50 components / 3 boards - saved $ 120;
- 50 components / 3 boards - saved $ 242;
- 10 components / 2 boards - saved $ 14;
- 10 components / 10 boards - saved $ 70;
- 80 components / 5 boards - saved $ 320;
- 80 components / 2 boards - $ 130 saved.
Also, if your blank PCB and components cost more than $ 100, you only need one wrongly assembled board to justify the cost of the stencil. The additional effect of increased yield can yield savings, even if the time and labor costs are commensurate. Conclusion
Sunstone Circuits offers stencils specifically designed to help you make your in-house PCB assembly process faster, easier, and better. The use of stencils for PCB assembly is becoming an increasingly common approach with the transition to SMT components and the ever-growing number of components used.
-
1. What is Graphic Overlay Panel?
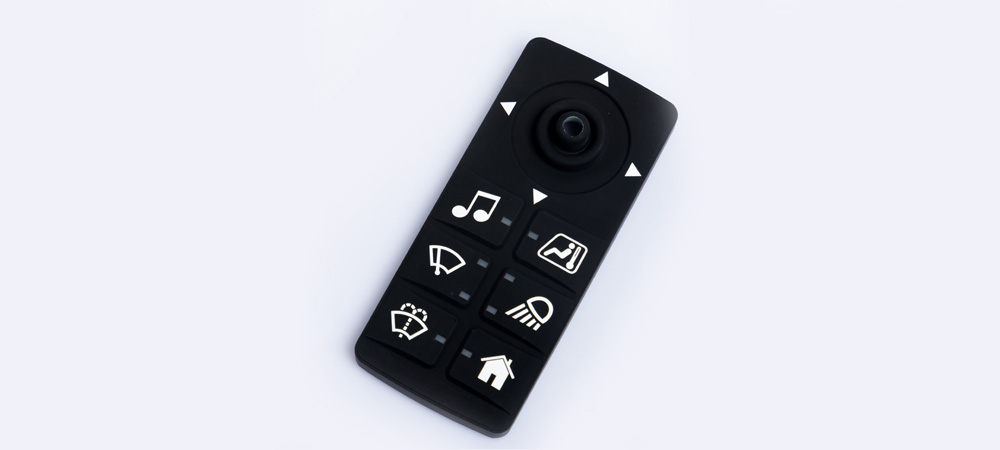
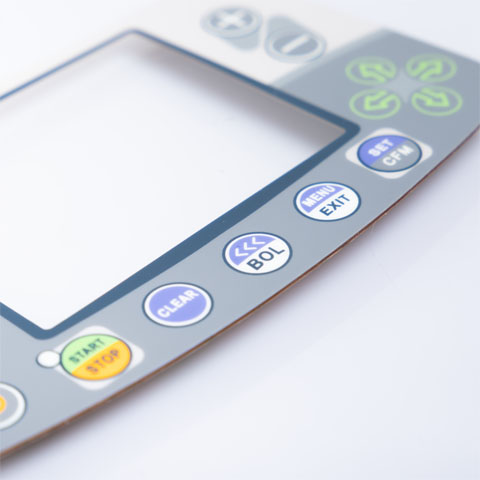
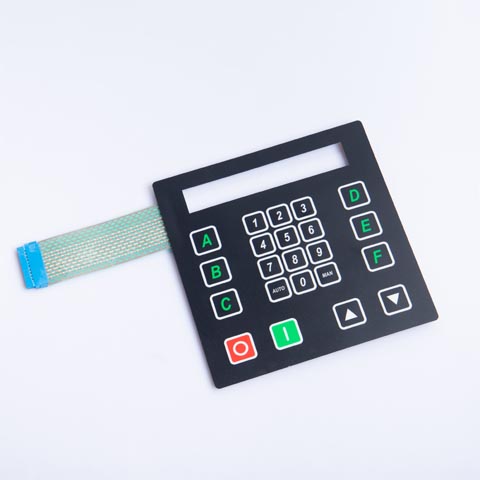
Graphic Overlay Panel is often used as the outermost product of electronic accessories, whether it is protection, instruction or promotion. Although the Graphic Overlay Panel has a relatively simple structure, it serves as a link between the previous and the next. The main function of Graphic Overlay Panel protects electronic switches and control devices. The more important purpose is to make the product easier to understand and operate. A good Graphic Overlay Panel can not only impress customers and users, but also make your Graphic Overlay Panel stand out in the market through a reasonable design. Work with Niceone-Keypad to use the most suitable materials and designs to enhance your entire product experience.

What are the novel designs of Graphic Overlay Panel?
There are many novel designs of Graphic Overlay Panel, among which Resin Dome and Silicone Rubber Keypad are used as the drawing design of Graphic Overlay Panel and Graphic Overlay Panel (similar to metal color)
-
2. What are the advantages of Graphic Overlay Panel?
The main reason why Graphic Overlay Panel has always been so dazzling in the market is that Graphic Overlay Panel can effectively enhance product user experience. Niceone-Keypad can enhance and improve your products through rapid design and production.
- Effectively extend product life
In many cases, the products behind the Graphic Overlay Panel are electronic accessories, hardware accessories or plastic. If the Graphic Overlay Panel is not used for protection, over time, they will be at risk of wear and chemical damage.
- Increase brand effect
The Graphic Overlay Panel gives you the opportunity to integrate the colors and unique functions of your brand into the control of the machine to print user logos and independent product logos. If the product is excellent, both potential users and existing users can pass Graphic Overlay Panel then understands the company's brand to increase its market share.
- Simplicity-reduce operating errors and improve efficienc
One of the more outstanding points of Graphic Overlay Panel is that it can express the functions of buttons and products through simple printing patterns. Even prominent warning signs help reduce operating errors and improve operator efficiency.
- Resistant to ultraviolet rays
Graphic Overlay Panel can have strong resistance to ultraviolet rays by choosing anti-ultraviolet materials such as Autotype's XE series polyester or DuPont's HPW series. The Graphic Overlay Panel will not yellow even if it is used outdoors for a long time. A customer of Niceone-Keypad once did an experiment, even after using it for a year in a place with strong outdoor ultraviolet rays, the product is still as new.
- Resistant to bacteria
Graphic Overlay Panel can be selected by anti-bacterial materials such as Autotype's VM series polyester. The Graphic Overlay Panel will not accumulate bacteria even if it is used in a place where there are many bacteria for a long time. The main reason is that the VM material has the effect of inhibiting bacteria.
- Easy to clean
Since most of the materials of the Graphic Overlay Panel are Lexan, Polycarbonate, Polyester or PVC (it is gradually eliminated due to environmental protection). The characteristics of this type of material are easy to clean. Compared with the traditional plastic panel or Silicone rubber Keypad. Therefore, the Graphic Overlay Panel is often used in the petroleum industry or the medical industry.
- Multifunctional solution
According to your needs to provide specific solutions for graphic overlays, there are a variety of materials for you to choose from. Express Image can provide you with the solution you are looking for. Our team of experts will take the time to understand the purpose and performance of your product so that you can apply the most effective graphic overlay.
-
3. What is the meaning of Dead Fronting of Graphic Overlay Panel?
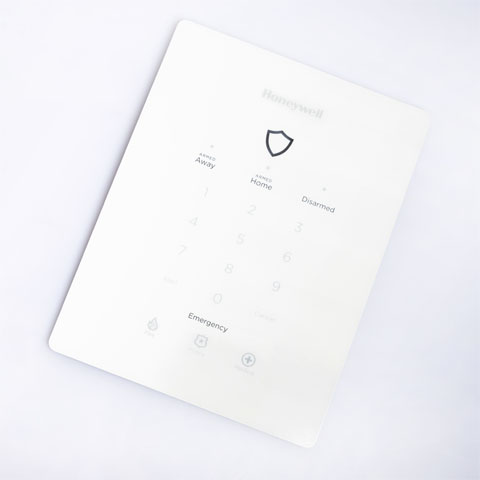
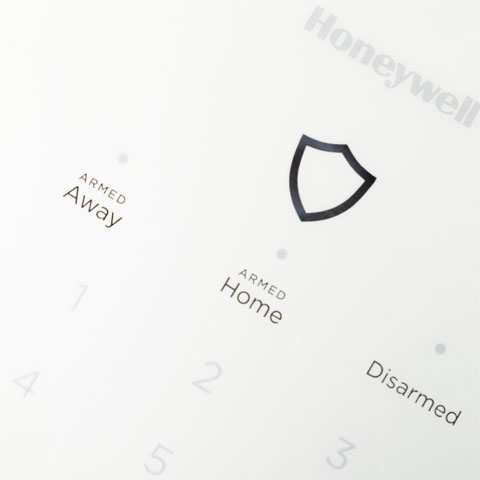
Dead Front Printing is a printing method of Graphic Overlay Panel. The indicator light, logo and text are usually close to the background color and hidden when they are not illuminated by the light source. This method is conducive to the effective invisibility of the indicator light, logo and text. In order to let you know more about Dead Front
What does the percentage of Dead Front Printing represent: In order to clarify this problem, Niceone-Keypad made a picture, hoping to help users and users

The printing method of Dead Front Printing:
There are usually two ways to illuminate Dead Front Printing, and there are different printing methods for different illuminating methods. The first is Dead Front Printing’s icons, logos, text or places that need to be lit with different colors of LEDs to light up. Since the LEDs provide different colors of light, the first color is generally transparent and close to the background color. Color, the second and third channels will avoid icons, logos, text or places that need to be lit. LEDs provide different colors of light transmission.
The second method is to selectively print different translucent colors behind various indicators. By using semi-transparent colors, almost any backlight method can be used, because the ink behind the image provides the hue for the indicator. Just use a white light source to illuminate the hidden colors of different colors. But this kind of printing method is more complicated than the first one, and the unit price will be more expensive.
Anoter name for Dead Front Printing::
-
- Dead Front
- Dead Front Lighting
- Dead Front Panels or Covers
- Backlit User Interfaces
- Backlit Graphics
- Backlit Printing
How to calculate Dead Front Printing?
-
- The color of the indicator light, logo, text or graphics that need to be hidden is almost the same as the background color when it is not lit. But the percentage of this type of Dead Front Printing has reached 90%.
- When the indicator light, logo, text or graphics that need to be hidden are illuminated, they can be evenly illuminated without impurities, shadows or bleeding.
What product is Dead Front Printing used in: Cockpit Dashboards, Aerospace indicators, Touch keypads, Instrument panels, Appliance displays, Gauge displays, Lighting control panels, etc.
Dead Front Printing's application industries include: Product Retro-fits and Upgrades, Medical Keypads, Industrial Keypads, Restaurant, High End Consumer, Automotive, Appliances, Complex Interfaces, etc。
The advantages of Dead Front Printing are:
-
- Cost effective dead front display
- Simplified user interface
- Less disruptive interface
- Multiple LED light colors
- Haptic feedback capable
- Easy to shield
- Thin format applications are possible
- Silver or copper PCB solutions
- Full color graphic overlays
Let Niceone-Keypad help you design and produce the Dead Front Printing control panel:
To develop an excellent Dead Front Printing control panel requires experimentation to get the best appearance and effect. Before designing Dead Front Printing, users and Niceone-Keypad need to know the choice of light source, the brand of ink, the choice of materials, etc. The superposition of the details of these products will eventually affect the Dead Front Printing effect. Niceone-Keypad has a complete design and production team including-engineering team, color matching laboratory and printing team. If you have any needs, you can contact Niceone-Keypad immediately.
-
-
4. What are the Textures and Finishes of Graphic Overlay Panel?
There are generally 4 finish options that come with the material of Graphic Overlay Panel: Gloss, Matte, fine, and Semi-Gloss.
- Gloss in Finish:
This kind of material has very high gloss, the material with the best transmittance and transparency, or the material can reflect more light like a mirror, has abrasion resistance and solvent resistance, the most common material is single-sided hardened transparent Polycarbonate And EBG materials in Polyester. If there are digital tubes or content that needs to be displayed behind the Graphic Overlay Panel, this type of material is a more prominent choice. However, glossy finishes have strong glare. Generally, it is necessary to print frosted ink except for windows to reduce glare hazards.
- Matte or Fine in Finish:
This kind of material has low gloss, and the matte surface does not provide any gloss. The matte surface with its own anti-glare effect is often used in areas with less dust and less mold. The main reason is that the Graphic Overlay Panel with matte surface is easy to absorb foreign matter and dust, and the color is easier to change over time. In order to solve this problem, Niceone-Keypad printed ink on the back of such products to avoid such problems. But this is also a problem Matte cannot avoid. But its anti-glare and soft image ability is excellent, so it still has a place in the market.
- Semi-Gloss in Finish:
Also called Satin finish, it is most commonly used in Graphic Overlay Panel. Since the beginning of 2015, we have recommended customers to use Semi-Gloss material as the Graphic Overlay Panel. Because Semi-Gloss Graphic Overlay has the advantages of both-anti-glare, and the matte surface is thinner and will not be too easy to cause the material over time Loss of activity, but the price is relatively expensive. Materials such as EBA.
Advantages Disadvantages Gloss - The best light transmittance
- Easy to clean
- Relatively long lifespan
- High glare
- Relatively high material prices
Matte or Fine: - No glare problem
- The silk-screened image is softer
- The price is relatively affordable
- The durability is not high
- Weakened color display
Semi-Gloss - Has the advantages of both
- The price is very high
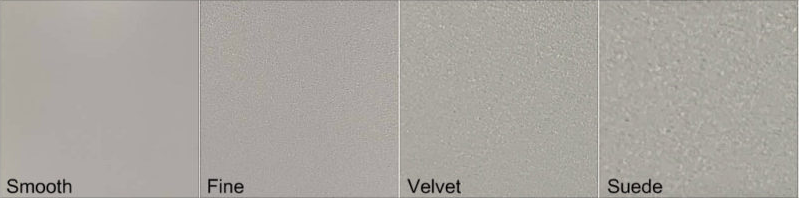
What does the Textures of Graphic Overlay Panel represent:
Texture has the following materials in most cases. As Graphic Overlay Panel manufacture, most of the time we will print different colors on the back of these materials to complete the product design. However, the Graphic Overlay Panel effects brought by different Textures materials are not the same, and their representative materials are also different.

Smooth(Gloss)
The best light transmittance, no texture, glare. Common materials are EBG and high permeability Polycarbonate materials. This material is used in electronic equipment with horoscope lights, displays and other products, because the content of the window is displayed. At the same time, this type of material is generally scratch-resistant and comes with the characteristics of chemical resistance. Cleaning is also relatively convenient and almost non-abrasive. The only drawback is that the material is a glare type material. However, the problem of this type of product can be solved by printing matte ink on the front side except for the buttons and windows. Common thicknesses are: 0.13 0.18 0.25mm
There is also a new type of Antiglare material-Kotutai's EBA. Anti-glare and easy to clean.
Antiglare
The light transmittance is between smooth and fine, and it also has the function of wear resistance. It is easy to clean and has no glare problems. Common materials are EBA or transparent polycarbonate. If there is a large area display under the panel, you can consider EBA. Because the use of Smooth material in a large area of the display window will cause glare problems, which will cause operational errors. Disadvantages: The ink adhesion is poor and the cost is relatively high. Common thicknesses are: 0.13 0.18 0.25mm.
Fine:
Common materials are translucent Polycarbonate and Autotype's F series. The fine texture provides a certain degree of abrasion resistance and LED light diffusion, and they are still easy to clean. Because fine-textured pebbles are smaller and provide less protection than textures with larger pebbles, polycarbonate with fine texture has a shorter lifespan than polycarbonate with larger texture. When used repeatedly, they are more prone to wear and smooth. If the product needs a window to be printed, then a special window ink needs to be used for printing on the surface. The product has no glare problem. The market used is larger.
Texture and Finish can be said to be the same thing, but in order to let users understand it more clearly, Niceone-Keypad hopes that this copy will give you a more detailed explanation. The following are its main advantages
Fine and Velvet main advantage
advantage Market Thickness: What we could choice? Smooth Long flex life Chemical and household cleaner resistance even at the edges
Clear window facility
Embossable
Excellent scratch resistance
Consistent low gloss, textured surface
Attractive appearance
Membrane switch overlays Touch screens
Facia panels
Nameplates
Labels/Product marking
0.125-0.25mm EBG,Gloss polycarbonate Antiglare EBA,antiglare polycarbonate Fine Long flex life Chemical and household cleaner resistance even at the edges
Clear window facility
Embossable
Excellent scratch resistance
Consistent low gloss, textured surface
Attractive appearance
0.125-2mm F150. Velvet V150,8A35 or 8B35 Polycarbonate -
5. What is the material selection of Graphic Overlay Panel?
There are 3 most common materials for Graphic Overlay Panel Choices for Control Panels. They are Polyester, polycarbonate and PVC. Each material has its own advantages and different application environments. The most common one is the Graphic Overlay Panel above the keyboard of a gas station or ATM. Customers and users need to know that different materials have great differences in the life, use, performance effects, and ways of using the Graphic Overlay Panel.

- Polyester
- Polyester's durability-it can also be said that the driving life exceeds 1,000,000 times, which means that the user is using the product with the convex type Grpahic Overlay Panel, and 1,000,000 times of normal use is completely fine. The life expectancy is generally as high as 3 years.
- It is more durable than polycarbonate in some applications and is cheaper in mass production.
- Polyester is more abrasion-resistant and more acid-resistant. It is an ideal material for medical and industrial applications.
- Suitable for Graphic Overlay Panel or Membrane Switch Panel with Embossing type.
- Polyester's common material brands are:
-
- DuPont Teijin Products
- Melinex
- Autotype Products
- AutoFlex EBG/A (Gloss and Anti-glare) Base Film is Dupont's Melinex O
- Autotex (Textured) Base Film is Dupont's Melinex O
- Autotex UV/XE
- Polycarbonate
- High light transmittance, providing a wider range of textures and finishes, which can be attractive when design is the most critical factor
- Because the bending strength is not strong and easy to break, it is suitable for Graphic Overlay Panel without Embossing or Graphic Overlay Panel with Embossing about 0.3-0.5mm.
- Impact resistance, the price is more affordable than polyester.
- PVC
The price is affordable, but it is not environmentally friendly and has been gradually eliminated by the market.
The difference between PET, PVC and PC:
Design details PET PVC PC Chemical resistance Good General Best Operating temperature: -30~110℃ -10~60℃ -20~120℃ Thickness: 0.05-0.25mm 0.125-0.5mm 0.125-1.0mm Surface: Glossy / Transparent to opaque/ Good light transmittance Glossy / Transparent to opaque / Good light transmittance Glossy / Transparent/ Good light transmittance Performance of Embossing: Good Good Best Fire resistance: Normal Bad UL 94V-2 Adhesion: Good Good Best Can it resist ultraviolet rays: YES NO YES Durability: Best Normal Good Environmental protection: YES NO YES Unless otherwise stated, Niceone-Keypad applies 3M products to all overlay and other graphics applications. The 3M graphics and Graphic Overlay adhesive series are considered the industry's outstanding adhesives. Here are some 3M adhesives commonly used by Niceone-Keypad:
- 3M467MP
- 3M468MP
- 300LSE
The Graphic Overlay Panel manufactured by Niceone-Keypad is durable enough, even in harsh deserts, humid environments, and strong ultraviolet radiation. The Graphic Overlay Panel only needs to choose the right materials and is not afraid of these environments. The Graphic Overlay Panel of Niceone-Keypad is suitable for various industries such as medical treatment, military industry, and industry. Niceone-Keypad produces competitive Graphic Overlay Panel in terms of durability and price.
-
6. How to get complete drawings and samples in the fastest way?
Time is money. Niceone-Keypad saves customers' time. When Niceone-Keypad obtains detailed information, the fastest time for drawing out is within 12 hours. The usual time is 3 days. The sample is usually completed within 10-20 days after the customer confirms the drawing. So what information do we need to give customers drawings and samples as quickly as possible?
In terms of drawings: First of all, Niceone-Keypad needs to know the purpose of the product, the specific color number, and editable documents, etc.
- The purpose of the product includes:use and medical, industrial, military, marine, fitness and agricultural equipment, etc. The choice of materials is different. If you can inform in advance, then there will be a preliminary plan for the choice of materials. The medical industry pays attention to the stability and durability of the products, so Adhesive usually chooses 3M or Nitto, and the panel material often chooses AM series or antibacterial Silicone Rubber material. And marine equipment should consider waterproof and resistance more often. Ultraviolet rays. Waterproof structure is required for waterproofing, and UV-resistant materials such as XE series or HP92W should be considered for UV resistance. This information can confirm most material choices.
- Specific color number: Different color numbers are different. If there is no specific color number, the overlay cannot be completely designed unless the customer informs that the color can be customized. The commonly used color number is Pantone or RAL. If it is a special color, the customer can also send the color patch to let Niceone-Keypad match it.
- Editable document: including size, color number, circuit principle, vector graphics is the best project document.
- Master samples:If the customer cannot provide any documents, Master samples are also possible.
A good drawing requires the cooperation of customers and suppliers. Niceone-Keypad hopes to save users' time and cost after providing Proof as soon as possible. This also requires the cooperation of customers.
If the customer feels that it takes too long to manufacture samples, Niceone-Keypad has the following suggestions:
-
- The material is best to choose more conventional
- If the sample is particularly urgent, you can consider using laser cutting
- Printing uses the printing method.
- If the product has Embossing, you can consider CNC etching abrasive tools. In this way, the sample can be completed in about 5 days.
-
7. What are the common problems of Graphic Overlay Panel?
The panel window is scratched: If the panel window is found to be scratched before using the Graphic Overlay Panel, it may be caused by the following situations.
-
- Reason 1: There is no protective film attached to the Overlay window of the Graphic Overlay Panel.
- Reason 2: The panel window is scratched during the mounting process.
If it is caused by scratches on the panel window during use, the main reason is: no hardening material is used.
Solution: If the Graphic Overlay Panel comes with a window, a protective film should be attached before use. The QC department should check the panel window during the placement process. At the same time, the Graphic Overlay Panel with window is best to use hardened and scratch-resistant materials such as EBG, single-sided hardened PC, hardened glass, etc.
Embossing deviation: Customers sometimes find that the Embossing of the Graphic Overlay Panel is a deviation
-
- Reason 1:Embossing mold is not calibrated.
- Reason 2:The silk-screen panel is not calibrated.
Solution: QC and engineering need to check molds and silk screen panels. This can solve this problem to a large extent.
Resin Dome is dirty: The raw material of Resin Dome is glue A and B. The situation of dirt and water streaks mainly depends on the environment and the way of standing.
Solution: It needs to be deployed and glued in a dust-free workshop. At the same time, use the grid board to stand the Resin Dome and make it solidify.
The ink adhesion is very poor: The ink peeled off during use of the Graphic Overlay Panel, or the ink peeled off during transportation.
-
- Reason 1: The ink is not compatible with the material, and it is necessary to select a suitable ink to print.
- Reason 2: The 100 grid test was not performed.
- Reason 3: The printing method and heating time are insufficient.
Solution: It is necessary to choose the ink with good compatibility with the material. For example, the adhesion of PET ink will be better if PET is used. But this requires the experience of the manufacturer. If the 100 grid test fails, you need to consider re-creating the Graphic Overlay Panel, and the 100 grid test needs to be performed before and after printing. Choose the appropriate printing method, and the heating time is selected according to the characteristics of the ink.
-
-
8. How to print Graphic Overlay Panel?
There are two common printing methods for Graphic Overlay Panel: Screen printing or Digital Printing. Both of them are excellent printing methods, but both have their own advantages. These processes provide visual elements for graphical overlays and improve usability by creating visual cues and labels for different functions on the user interface.
Screen Printing: It is often used for polycarbonate (LEXAN) or Polyester materials. When the quantity is less than 500pcs, the cost of Screen printing is more affordable than that of Digital Printing. The color of Screen Printing is mainly based on RAL or Pantone color number. At the same time, the color error of Screen Printing is small and easy to proofread. Screen Printing also acts on the use of conductive inks. Silk screen creates more durable and longer lasting products. In screen printing, the ink is applied in heavier and thicker layers to obtain more vivid and vivid colors. The cover layer is usually "back-printed" or "printed on the secondary surface" to increase durability.
Digital Printing: mainly uses the color collision of CMYK to form a complete color system, suitable for gradual effects, Graphic Overlay Panel that requires a large number of colors to be displayed, or Graphic Overlay Panel for mass production. However, Digital Printing is printed on Polycarbonate or Graphic Overlay from Polyester. Panels are usually lighter or translucent in color, and white ink needs to be printed on the back of the material to make the color thicker. At the same time, the price of Digital Printing will be more affordable when users need large quantities of Graphic Overlay panels.
Screen Printing Digital Printing Color series use: RAL,PANTONE CMYK Cost: Below 500pcs, the cost is lower than Digital Pringint. It is a Graphic Overlay Panel suitable for mass production. Their unique advantages: users who have stricter requirements on colors. The color can be gradient, Graphic Overlay needs a large number of colors to display. And can tolerate color errors. Conductive ink printing: suitable for conductive ink printing not suitable for conductive ink printing